FLOW MEASUREMENT
CONTENTS:-
1.Orifice Flow meter
2.Vortex flow meter
3.Ultrasonic flow meter
4.Coriolis Mass Flowmeters
5.Major issues for selecting flow meters
1.) Orifice Flow-meters:-
Several sensors rely on the pressure drop or head occurring as a fluid flows by a resistance. The relationship between flow rate and pressure difference is determined by the Bernoulli equation.
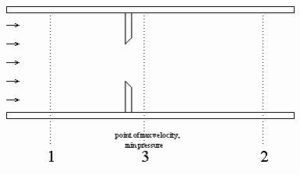
- An orifice plate is a restriction with an opening smaller than the pipe diameter which is inserted in the pipe; the typical orifice plate has a concentric, sharp edged opening.
- Because of the smaller area the fluid velocity increases, causing a corresponding decrease in pressure.
- The flow rate can be calculated from the measured pressure drop across the orifice plate, P1-P3.
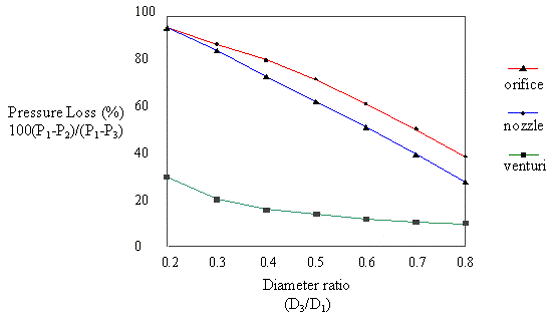
- The orifice plate is the most commonly used flow sensor, but it creates a rather large non-recoverable pressure due to the turbulence around the plate, leading to high energy consumption.
Bernoulli’s equation
where f represents the total friction loss that is usually assumed negligible.
General head meter equation
The meter coefficient, Cmeter, is for all non-idealities, including friction losses, and depends on the type of meter, the ratio of cross sectional areas and the Reynolds number. The compressibility factor, Y, accounts for the expansion of compressible gases; it is 1.0 for incompressible fluids. These two factors can be estimated through calibration.
Relationship for installed head meter
When the process is operating, the meter parameters are fixed, and the pressure difference is measured. Then, the flow can be calculated from the meter equation, using the appropriate values for Cmeter and Y. All constants are combined, leading to the above relationship.
A.) Venturi Tube:-
The change in cross-sectional area in the venturi tube causes a pressure change between the convergent section and the throat, and the flow rate can be determined from this pressure drop. Although more expensive that an orifice plate; the venturi tube introduces substantially lower non-recoverable pressure drops
B.) Pitot Tubes:-
- Pitot tubes were invented by Henri Pitot in 1732 to measure the flowing velocity of fluids. Basically a differential pressure (d/p) flowmeter, a pitot tube measures two pressures: the static and the total impact pressure.
- Pitot tubes are used to measure air flow in pipes, ducts, and stacks, and liquid flow in pipes, weirs, and open channels.
- While accuracy and rangeability are relatively low, pitot tubes are simple, reliable, inexpensive, and suited for a variety of environmental conditions, including extremely high temperatures and a wide range of pressures.
- The point velocity of approach (VP) can be calculated by taking the square root of the difference between the total pressure (PT) and the static pressure (P) and multiplying that by the C/D ratio, where C is a dimensional constant and D is density:
- A single-port pitot tube can measure the flow velocity at only a single point in the cross-section of a flowing stream.
- The probe must be inserted to a point in the flowing stream where the flow velocity is the average of the velocities across the cross-section, and its impact port must face directly into the fluid flow.
Pitot tube Flow-meters
- The pitot tube measures the static and dynamic (or impact) pressures of the fluid at one point in the pipe.
- The flow rate can be determined from the difference between the static and dynamic pressures which is the velocity head of the fluid flow.
- Both the pitot tube and annubar contribute very small pressure drops, but they are not physically strong and should be used only with clean fluids.
Elbow meters
1.A differential pressure exists when a flowing fluid changes direction due to a pipe turn or elbow.
2.The pressure difference results from the centrifugal force.
3.Since pipe elbows exist in plants, the cost for these meters is very low.
4.The accuracy is very poor; there are only applied when reproducibility is sufficient and other flow measurements would be very costly.
Flow Nozzle Flow-meters
1.A flow nozzle consists of a restriction with an elliptical contour approach section that terminates in a cylindrical throat section.
2.Pressure drop between the locations one pipe diameter upstream and one-half pipe diameter downstream is measured.
3.Flow nozzles provide an intermediate pressure drop between orifice plates and venturi tubes; also, they are applicable to some slurry systems.
Comparison between flow-meters
2.) Vortex Flow-meters:-
- This measuring principle is based on the fact that vortices are formed downstream of an obstacle in a fluid flow, e.g. behind a bridge pillar.
- This phenomenon is commonly known as the Kármán vortex street.
1.When the fluid flows past a bluff body in the measuring tube, vortices are alternately formed on each side of this body.
2.The frequency of vortex shedding down each side of the bluff body is directly proportional to mean flow velocity and to volume flow.
3.As they shed in the downstream flow, each of the alternating vortices creates a local low pressure area in the measuring tube.
1.This is detected by a sensor, such as capacitive sensor and fed to the electronic processor as a primary, digitized, linear signal.
2.Capacitive sensors with integrated temperature measurement can directly register the mass flow of saturated steam as well, for example.
- Universally suitable for measuring liquids, gases and steam
- Largely unaffected by changes in pressure, temperature and viscosity
- High long-term stability (lifetime K factor), no zero-point drift
- No moving parts
- Marginal pressure loss
Drag Force Flowmeters
- A body immersed in a flowing fluid is subjected to a drag force that is proportional to the fluid velocity square, cross section area, fluid mass density and drag coefficient.
- For sufficiently high Reynold number and a proper shaped body, the drag coefficient is reasonably constant. Therefore, the drag force is proportional to the fluid velocity square.
- The drag force can be measured by strain gauges using a cantilever beam or other structures.
- The main advantage of this class of flowmeters is the high dynamic response. The damping can be quite small.
3.) Ultrasonic flow-meters:-
- Swimming against the flow requires more power and more time than swimming with the flow. Ultrasonic flow measurement is based on this elementary transit time difference effect.
- Two sensors mounted on the pipe simultaneously send and receive ultrasonic pulses.
- At zero flow, both sensors receive the transmitted ultrasonic wave at the same time, i.e. without transit time delay.
- When the fluid is in motion, the waves of ultrasonic sound do not reach the two sensors at the same time.
- This measured “transit time difference” is directly proportional to the flow velocity and therefore to flow volume.
- By using the absolute transit times both the averaged fluid velocity and the speed of sound can be calculated.
- Ultrasonic flow meters measure the difference of the propagation time (transit time) of ultrasonic pulses propagating in (normally an inclination angle around 30 to 45° is used) flow direction and against the flow direction.
- This time difference is a measure for the averaged velocity of the fluid along the path of the ultrasonic beam.
- Using the two transit times tup and tdown and the distance between receiving and transmitting transducers L and the inclination angle α, one can write the equations
- where v is the average velocity of the fluid along the sound path and c is the speed of sound.
- Measurement of the doppler shift resulting in reflecting an ultrasonic beam off the flowing fluid is another recent, accurate innovation made possible by electronics.
Non-contact measurement from outside. Ideal for measuring highly aggressive liquids or fluids under high pressure advantage.
- With homogeneous fluids, the principle is independent of pressure, temperature, conductivity and viscosity
- Usable for a wide range of nominal diameters Direct meter installation on existing pipes.
- Non-invasive measurement
- No pipe constrictions, no pressure losses
- No moving parts. Minimum outlay for maintenance and upkeep.
4.) Coriolis Mass Flowmeters:-
- If a moving mass is subjected to an oscillation perpendicular to its direction of movement, Coriolis forces occur depending on the mass flow.
- A Coriolis mass flowmeter has oscillating measuring tubes to precisely achieve this effect.
- Coriolis forces are generated when a fluid (= mass) flows through these oscillating tubes. Sensors at the inlet and outlet ends register the resultant phase shift in the tube’s oscillation geometry.
- The processor analyzes this information and uses it to compute the rate of mass flow.
- The oscillation frequency of the measuring tubes themselves, moreover, is a direct measure of the fluids’ density.
- The temperature of the measuring tube is also registered for compensating thermal influences. This signal corresponds to the process temperature and is also available as an output signal.
- Using the Coriolis effect that causes a laterally vibrating tube to distort, a direct measurement of mass flow can be obtained in a Coriolis flow meter.
- Coriolis measurement can be very accurate and is very insensitive to variations in the medium that is measured.
- The same measurement tube can be used for measuring anything between hydrogen gas and for instance peanut butter without re-calibration.
- The advantage:
- This principle is used in a huge range of industry sectors, including pharmaceuticals, chemicals and petrochemicals, oil and gas, food, and also in custody transfer applications in general.
- What is the Coriolis Principle?
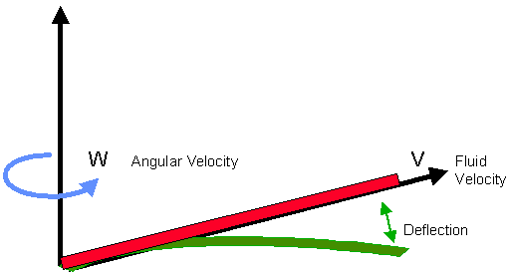
Imagine a fluid flowing (at Velocity V) in a Rotating Elastic tube as shown Below. The fluid will deflect the tube.
Considering A Mass M Moving from the center to the edge of a rotating Plate. This Mass M will take Path B as shown.
If the mass M is guided by Wall A (i.e. the tube), a Coriolis force will be exerted on the wall as: Coriolis Force Fc = (-) 2 * M * V * W
5.) Major issues for selecting flowmeters:-
Accuracy – Accuracy is the degree of conformity of the measured value with the accepted standard or ideal value, which we can take as the true physical variable.
Accuracy is usually reported as a range of maximum inaccuracy. These ranges should have a significance level, such as 95% of the measurements will be within the inaccuracy range.
Orifice flow meters with accuracy of ±3% of maximum flow range.
Repeatability – The closeness of agreement among a number of consecutive measurements of the same variable (value) under the same operating conditions, approaching in the same direction.
Reproducibility – The closeness of agreement among a number of consecutive measurements of the same variable (value) under the same operating conditions over a period of time, approaching from both directions. This is usually expressed as non-reproducibility as a percentage of range (span).
Often, an important balance is between accuracy and reproducibility, with the proper choice depending on each process application.
Linearity – This is the closeness to a straight line of the relationship between the true process variable and the measurement.Lack of linearity does not necessarily degrade sensor performance. If the nonlinearity can be modeled and an appropriate correction applied to the measurement before it is used for monitoring and control, the effect of the non-linearity can be eliminated.
Linearity is usually reported as non-linearity, which is the maximum of the deviation between the calibration curve and a straight line positioned so that the maximum deviation is minimized.
Reliability – Reliability is the probability that a device will adequately perform (as specified) for a period of time under specified operating conditions. Some sensors are required for safety or product quality, and therefore, they should be very reliable. Reliability is affected by maintenance and consistency with process environment.
Range/Span – Most sensors have a limited range over which a process variable can be measured, defined by the lower and upper range values. Usually, the larger the range, the poorer the accuracy, and reproducibility. Therefore, engineers select the smallest range that satisfies the process requirements.
Rangeability is the ratio of full span to smallest flow that can be measured with sufficient accuracy. If a chemical reactor typically operates at 300 °C, the engineer might select a range of 250-350 °C. Since the reactor will be started up from ambient temperature occasionally, an additional sensor should be provided with a range of -50 to 400 °C.
Dynamics – The use of the sensor dictates the allowable delay in the sensor response. When the measured value is used for control, sensor delays should be minimized, while sensors used for monitoring longer-term trends can have some delay.
Safety – The sensor and transmitter often require electrical power. Since the sensor is located at the process equipment, the environment could contain flammable gases, which could explode when a spark occurs.
Maintenance – Sensors require occasional testing and replacement of selected components that can wear. Engineers must know the maintenance requirements so that they can provide adequate spare parts and personnel time. Naturally, the maintenance costs must be included in the economic analysis of a design.
Cost – Engineers must always consider cost when making design and operations decisions. Sensors involve costs and when selected properly, provide benefits. These must be quantified and a profitability analysis performed. Remember that the total cost includes costs of transmission (wiring around the plant), installation, documentation, plant operations, and maintenance over the life of the sensor.


