TURBINE AT A GLANCE
1.) WORKING OF STEAM TURBINE
A steam turbine works on the principle of conversion of High pressure & temperature steam into high Kinetic energy, thereby giving torque to a moving rotor.
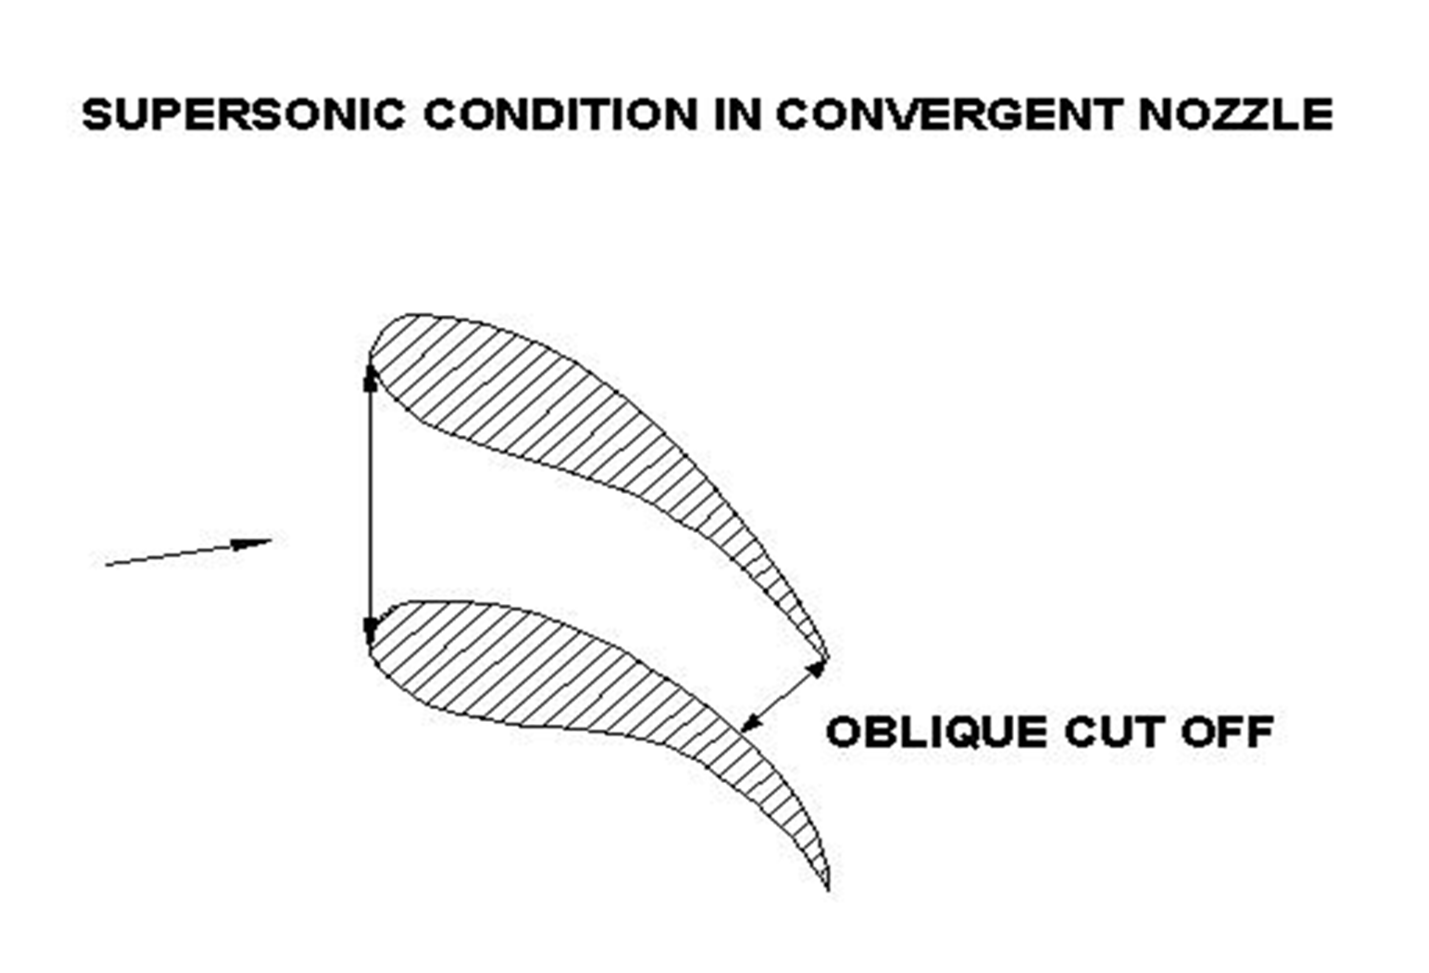
For above energy conversion there is requirement of converging /Converging-Diverging Sections
Such above requirement is built up in the space between two consecutive blades of fixed and moving blades rows.
2.) TYPE OF TURBINE
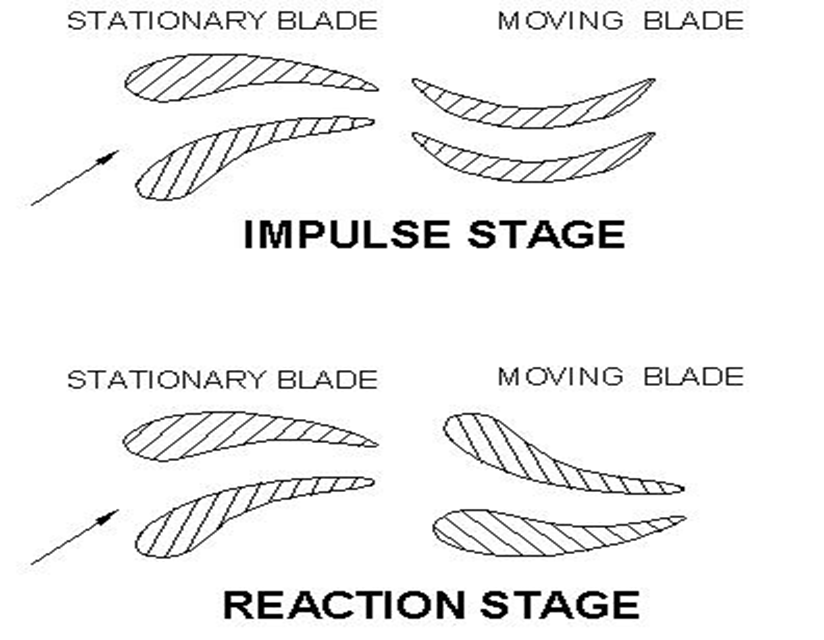
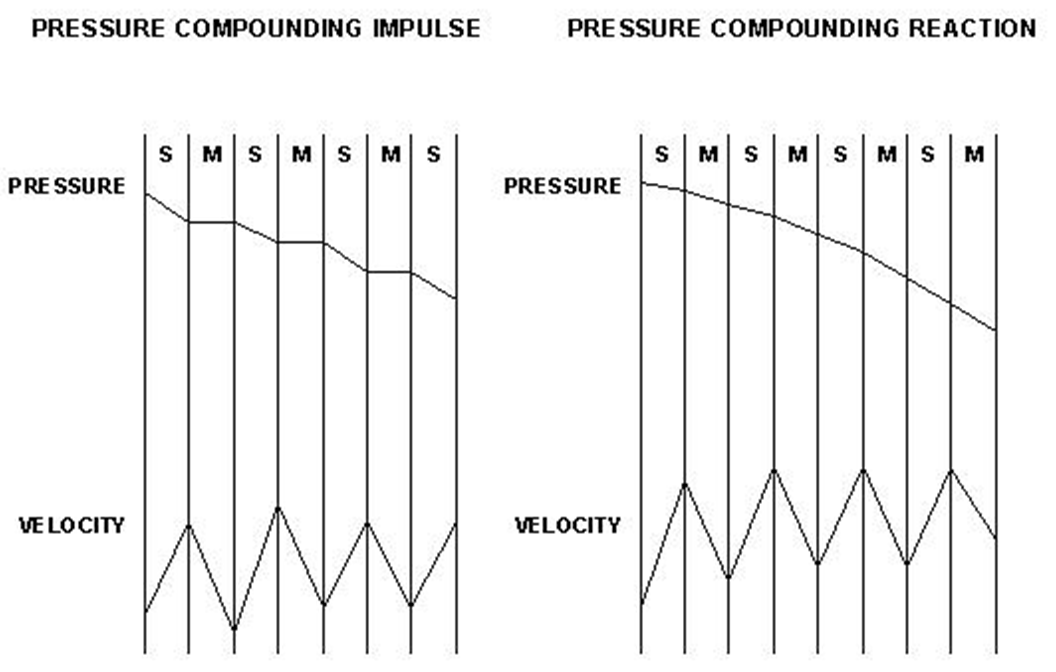
IMPULSE TURBINE = In a stage of Impulse turbine the pressure/Enthalpy drop takes place only in Fixed blades and not in the moving blades.
REACTION TURBINE = In a stage of Reaction Turbine the Pressure/enthalpy drop takes place in both the fixed and moving blades.
3.) DEGREE OF REACTION=
( Heat drop in Moving stage)
( Heat drop in moving blade + Heat drop in fixed blade)
In impulse stage ,degree of reaction is O
Single stage impulse turbine is called as De-laval Turbine.
Series of impulse stages is called as Rateau Turbine
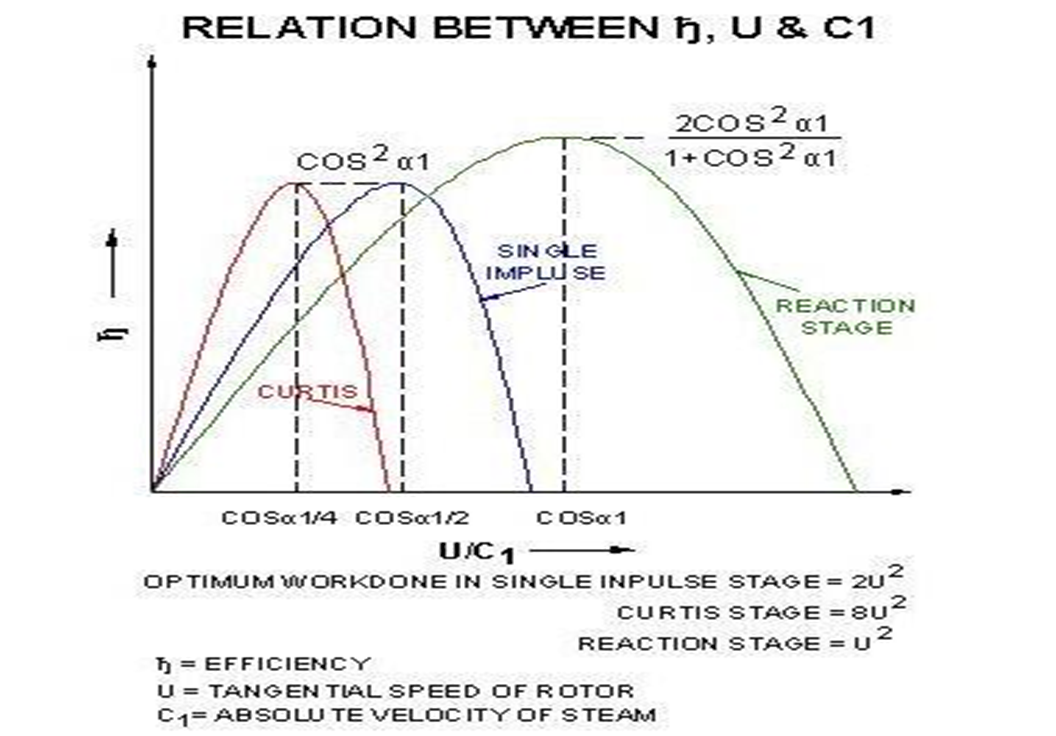
Double Stage Velocity Compounded impulse turbine is called as Curtis Stages
50% Reaction turbine is called as Parson Turbine
Practically the degree of reaction of a stage can be 0 – 60% over the different stages of a turbine
Velocity Compounded Turbines Here the High temperature, Pressure Steam is expanded in a single row of fixed blades into very high velocity which is then fed to 2 or 3 rows of moving blades with one each guide/turning row placed in between the two moving stages.
Pressure compounding Turbines Here the pressure is dropped in stages and employs low velocity of Steam in each stage. Each stage consists of Fixed blade( nozzles) and moving blades.
4.) LOSSES IN STEAM TURBINE
Friction losses
Leakage losses
Windage loss( More in Rotors having Discs)
Exit Velocity loss
Incidence and Exit loss
Secondary loss
Loss due to wetness
Loss at the Bearings (appx 0.3% of total output)
Off design losses
MAIN LOSSES IN TURBINE
FRICTION LOSS It is more in Impulse turbines than Reaction Turbines,because impulse turbines uses high velocity of steam and further the flow in the moving blades of the Reaction turbines is accelerating which leads to better and smooth flow(Turbulent flow gets converted to Laminar flow)
LEAKAGE,S LOSS It is more in Reaction turbines than Impulse turbines because there is Pressure difference across the moving stage of reaction turbines which leads to the Leakages. In Impulse turbine such condition is not there.
Leakage loss predominates over friction losses in the High Pressure end of the Turbine
Friction Losses predominates over the Leakage’s Loss in the Low Pressure end of the Turbine.
It is observed that the Efficiency of The IP Turbine is the maximum followed by The HP and LP Turbine .
LMZ Turbines are more impulse in nature
KWU Turbines are more reactive in nature
Sparing Rateau and Curtis stages, all other stages of turbine is a mixture of Impulse and Reaction with varying degree of reaction.
Pressure/Enthalpy drop is more in Impulse stage than in reaction.
Comparatively Reaction Blade is more efficient than the Impulse blade.
Impulse turbine requires fewer no. of stages than reaction turbine for same condition of steam and power requirement.
MODIFICATIONS IN THE BLADESIN TERMS OF EFFICIENCY
T2 It is comparatively flat blade with Thinner inlet
T4 It is More Curved and thicker inlet
Tx More Curved, thicker inlet but thinner outlet
3DS Three Dimensional with reduction in secondary losses
LUBRICATION
Turbine bearings are hydro dynamically lubricated. For this to happen following things are important
-
Viscosity of oil which is directly related to the oil Temperature.
-
Rotation/speed of the Rotor.
-
Desired Clearances/Converging Wedge in the Bearings. (convergence should be in the direction of rotation)
In fact the Pressure of the Lube oil is mainly just to ensure that oil reaches the Bearing. However it is also very important and requires to be maintained as per design.
LUBRICATION
As rotor rotates at low speed ,initially there is no film lubrication but as its speed increases there is conversion of boundary layer lubrication into Film lubrication.
From zero speed to appx. 540 RPM there is no continuos film between rotor and bearings and there is chance of rubbing between rotor and Bearing. Therefore JOP is used to prevent the contact between rotor and bearings.
At Above 540 RPM the JOP can be Switched off, as film lubrication comes into picture.
It is to be noted that when the surfaces are parallel the volume flow rate at inlet is less than the outlet flow rate and film can,t sustain.
Therefore for a stable film, area needs to be convergent to ensure equal volume flow throughout the length.
The minimum clearance depends upon following
– Viscosity of oil
– Speed of Rotor
– Load on the rotor
TYPE OF BEARINGS
Cylindrical Bearing( Single wedge ring) This has single oil inlet
Elliptical Bearing( Double wedge bearing) This has double oil inlet
Segment Bearing( Multi wedge Bearing)
BEARINGS
Cylindrical bearings are normally used for system where no transients are envisaged particularly in turbines without controlling stage, whereby one side radial impulse due to steam forces is not there.
Multi wedge bearings are used by installing bearings in segments . Each Segment will have its own wedge.
Multi wedge bearings can take more load ,can dampen the sudden disturbance on shaft and there is no formation of Oil Whirl and low frequency vibration components.
BEARINGS
Acceptance of Dye Penetrant testing ,DPT & Ultrasonic testing, UT results should be strictly as per BHEL (Hyderabad) AA 0850126 standard which is available on COS website.
Always carry out DPT test before UT Test
If any old bearing fails then replace with New/ Rebbabited bearings (both the halves needs to be replaced)
If New / Rebbabited bearing is used then ensure blue matching of pads with respect to their female seats.
Blue matching of pads of old good or New/ rebaabbited bearing with pedestal should be more than > 90 % with all the sides touching all around .
Bearing should not be touched with hand S.O.C and T.O.C of bearing should be made on machine only. In no case babbit to be removed manually more than 0.1 mm ( across dia)
Bedding should be 30-35 degrees all around on both sides.
-Less bedding will lead to more oil leakages from the side of the bearing
– Extra bedding will lead to more friction loss.
No of shims in each pad should not be more than 4 nos. If it is more , substitute with suitable equivalent sheet of stainless steel only.
The difference in the values of SOC and TOC when measured from two sides (front and rear) of bearing should not be more than 0.05 mm.
Thumb Rule : In any bearing the side oil clearance on one side will be appx. equal to D/500 mm, where D is the rotor Dia in mm.
OVERSHOT OIL GROOVE IS VERY-2
IMPORTANT. ALWAYS CHECK FOR IT
While measuring S.O.C ensure that the feeler should go into the gap neither less and nor more than appx. 25 mm.
Never Exchange the bearing shell of thrust bearing with the yoke of other bearing and viceversa. Always use their Original set in pair.
BEARINGS AND TOROUS/PEDESTAL CONTACT
Three types of contacts are there
-
Cylindrical-cylindrical
-
Spherical- spherical
-
Spherical -Cylindrical
Cylindrical-cylindrical contact can be obtained by the manual scrapping, but Spherical- spherical and Cylindrical- Spherical should be brought with the machining only. In Urgency spherical-spherical can be rectified at site provided correction is very small.
INTERFERENCE OF THE BEARINGS WITH THE PEDESTAL
Interference is kept to ensure proper loading on the Bearing Top to ensure its proper clamping which helps in the damping of the bearing Vibration
It is in the limit 0f 0.15 to 0.35 mm
This check is carried out after the completion of the TOC checking of the bearing.
ALIGNMENT
-
Alignment readings are taken at four positions at 12,3,6,9,12 O clock position by rotating the couplings together
Readings for Radial Alignment is taken by Dial Gauges at four locations.
Readings for axial alignment ie the gap between the couplings is taken by the means of the slip Gauges at four location of couplings ie L,R,T,B each at four position of clock. Axial reading is averaged for four position of the Coupling locations
ALIGNMENT
-
Always Ensure Bedding of the rotor with the bearing.
-
During alignment process for IP-LP and LP-GEN coupling , condenser is to be kept on springs and water filled upto the tubenest level. During the final correction/ checking place LPT top half in position and tighten intermittently
-
Always take readings for two sets.
-
Best compromise between alignment and slope is to be achieved with priority for alignment.
-
Always refer to the Dismantling readings of Alignment , Seal Bore and Slope during the process of alignment.
ALIGNMENT
Alignment Deemed to be over
If the readings obtained are as per design values
Readings obtained in two consecutive sets are appx. Identical
Check whether readings of L+R = T+B . If difference is there then readings are not proper.
Ensure the final radial position of couplings is same as of set datum initially. If it is more than 0.01 mm then retake the reading.
SEAL BORE
Seal Bore readings are the Rotor Centering readings with respect to the Bearing Pedestals.
It is measured by means of inside micrometers from the oil guard Seat surface to the surface of the rotor Journal. At each location it is measured at the three points, Left, Right, bottom
Seal bore readings are the reference readings for any correction and normally should not change.
But over a period of time due to change in foundation characteristics it can lead to change in seal bore readings.
CATENARY
When rotors are resting in free condition on their bearings, there will be individual sags in them due to its dead weight and dimensions.
Due to above the mating coupling faces of the rotors shall be at an angle. In this condition it is very difficult to couple the rotors.
To align the coupling faces the rotors are given vertical adjustment through bearing or pedestal adjustment so that they become parallel and coupling becomes easier. One rotor normally LP rotor is kept as MASTER.
From above adjustment the deflected lines of rotors also approaches the Center line which reduces the Centrifugal forces on the rotor.
CATENARY /SLOPE ADJUSTMENT
Correction / Adjustment in the Slope is carried out by making changes in the Pads / Keys of the bottom half of the bearing .
In New design it is carried out by Spring Deck Correction whereby the whole pedestal lift is affected by means of adding/ removing plates/Sheets in the spring deck foundation.
CATENARY /SLOPE
Slope is measured by Microlevel. Before taking slope readings , MICROLEVEL should be calibrated. It should be calibrated on a Known surface like Lathe machine Bed and then sealed with lacquer to avoid any disturbance.
After above slopes should be taken in the two direction(to minimize the any error of the level). Second one in 180 degree opposite to first position but at the same location . For this ensure the vertical level is in the center
Final slope reading is the average of the two readings
Slopes are measured by a micro level one division of which corresponds to slope of 0.1 mm per mtr length
Slope to be taken in uncoupled position of rotors
CENTERING
Centering is the Radial clearances between the Diaphragms/Casing blades with the Rotor
In LMZ,SKODA,GE Turbines it is measured by means of False Rotor shaft, where by reading are measured at three position L,R,B at each stage of Diaphragms and Glands. Readings are measured by Inside micrometer.
Correction is affected by means of Keys in the Diaphragms/casing
CENTERING
-
Before taking centering readings ensure radial play of diaphragm in Liner and gland boxes in no case should be more than 0.08 mm
-
During centering reading push the components towards Left side
-
No of shims packers below each key should not be more than 4. If it is more than it then replace it with suitable sheet of equivalent size of SS
CENTERING
In KWU turbines it is measured by actually lifting ,downing and moving left and right the inner casing w.r.t rotor which is rotated in the bearings.It is also called as ROLL CHECK .At the moment where touching/Resistance is observed gives value of the clearance between casing and rotor. Inner casing movement is affected by means of Hydraulic Jacks and Screws. It is a faster means of Centering check
Correction is affected by means of changing Dimensions of keys of the Casing.
IMPORTANCE OF SEALS
Sealing fins reduces the leakage’s of steam through inter stage and turbine ends there by leading to high efficiency and better Heat Rate
They also result in balancing of the Thrust.
Sealing fins deemed to be reject/damaged
-
When the desired clearances have increased
-
When their Knife edge is lost or found bend
-
When they are broken at the intermittent places
SEALINGS RINGS
During Overhauling ,Even if the Old Seals
are used, never use the old Helical/ Flat Springs
Butt Clearances between sealing segments should be strictly as per Design values.
SEAL FIN CUTTING
It is checked by Tape Test
Gland Sealing segment Radial clearance are checked by a putting Suitable Medical Adhesive tape sealed on rotor and colored by blue color and then rotating the rotor by 360o. If the fins are not touching with tape then the clearance achieved is equal to the Thickness of the tape.
Wherever rubbing in the tape is observed the corresponding row of segments are taken out , further grinded and rechecked sane as above to get the designed clearances.
SWING CHECK
Swing check is a measurement which shows the mating accuracy of the coupling faces of the two rotors coupled together.
It is the measurement of the radial throw at the free end due to coupling face geometric form of the two rotors coupled together.
It is carried out by removing the Real bearing and putting a false bearing/Lifting tackle on which the rotor is supported. This false bearing has larger side oil clearances. Dial is put at the horizontal level and then rotors are rotated . Readings are taken at many positions, The max throw is the Swing of the rotor.
SWING CHECK
Readings are to be recorded after elongation of all coupling bolts of HP-IP and IP-LP coupling.
Allowable Swing value depends upon the diameter of coupling and length of rotor.
The final dial gauge reading at start position should be same as the Initial set Dial gauge reading at start position
If the swing check is on very high side then same is to be corrected by following method
— By interchanging the coupling position
Improving facial run out
Honing and reaming & fixing with new coupling bolts.
ELEVATION TRANSFER
It is the measurement taken between the two mating parts which are themselves assembled in two halves.
This is taken to ensure proper fitting of the components so that there is no fouling among themselves.
This measurement is taken by Height Gauge at the parting plane on both the sides.
BUMP CHECK
It is Maximum total axial gap of the steam path of the turbine Cylinders . Normally carried out for HP& IP Cylinders
It is measured by moving the entire rotors from the zero position on either side.( Zero position is Rotor collar on the working thrust pads in LMZ turbines and Rotor collar in the 50% float Position of the thrust Bearing in KWU Machines)
The Reading is taken by Dial Gauges
Total sum of the Left and right movement is the BUMP Value
BEARING FLOAT
It is the total axial movement of the Rotors between the working and the Non working Pads of the Thrust Bearing.
It is measured by moving the rotors from the extreme end of the working pads to the extreme end of the Non working pads or vice versa Reading is measured by Dial Gauges .
Its value varies from 0.3 mm to 0.55 mm depending upon the turbine design
Value less than the design value leads to Lubrication problem
BEARING FLOAT
Value more than the design value can lead to accelerated wearing of the Babbit pads
HORN DROP TEST
By horn drop test the loading of the casing on each corner is determined. It is taken on HP and IP Outer Casing.
In a horn drop test a drop is measured on an individual corner of the casing with the help of dial indicator by removing the support of the individual corner and then it is compared with the opposite corner.
Procedure . During the horn drop test the individual packer of the casing is removed and the load of that corner is supported over the jacking screws of the casing . Now gradually the jacking screw is
HORN DROP TEST relieved with the help of Hydraulic jacks on that corner and drop is recorded. This is repeated for each corner of the casing.
In case of variation in the left and right side reading the drop is adjusted by adjustment of the shims from left to right or vice versa . No addition/subtraction of shims is allowed from the outside.Correction is carried out till the equal loading is observed.
Above Complete test at four corners is again repeated after joining all the Pipe lines with the Casing
The variation in horn drop reading of left and right side of the casing may be permitted up to difference of 50%.
If the variation is much , then no correction is made by adjustment of casing packers. The variation at this stage is caused due to piping pull /push only and hence if any correction is required then the same is to be carried out in the piping joints and its Hangers support only. Sometimes it is necessary to cut the piping joint for the necessary correction.
ANCHOR POINT
Anything when heated will expand. Same is true for Turbine rotors and Casings.
Problem with rotors is more complex as it is also subjected to the axial thrust also.
To allow their controlled motion during operation and to prevent any eventuality between rotor and casing they are required to be anchored
Rotors are anchored at Bearing no 2(between HP &IP) by means of thrust bearing. In some Turbines they are also anchored at free end
Thrust bearing( Anchor point) is always located near High temperature end to minimize the differential expansion.
ANCHOR POINTS
Casings which are connected together by means of pedestals and keys have LPT front as the anchor point.
It is to be noted that rotor rests on the bearings and bearings further rests on the pedestals
The pedestals can be moving / sliding or can be fixed. When it is sliding it carries bearing along with it which further carries rotor along with it.
When pedestals are fixed the necessary casing expansion is taken by the bellows at the ends.
Total Expansion of Turbine can be calculated which is appx. Equal to LαΔT where
L = Length of Turbine
α = coefficient of thermal expansion
ΔT= Difference of temperature.
DIFFERENTIAL EXPANSION
It is the difference between the rotor expansion and the Casing Expansion
It is +ve if rotor expands more than casing
It is -ve if casing expands more than rotor
During initial startup diff Exp. is +ve as rotor mass is less and expands at more faster stage than casing. After full load this gap reduces.
Diff. Expansion pick up is mounted at the farthest point from the anchor point to record the max difference.
AXIAL SHIFT
Axial shift on the Rotors comes due to two components
Direct Pressure Thrust: It is the axial thrust due the diff of the pressure X Area component across the moving stage blading and Discs
Velocity Component: It is due to diff. of the velocity X Mass component across the moving stage blading.
Total summation of all the above components leads to the Axial Thrust.
AXIAL SHIFT
Axial Thrust is +ve if it is towards generator
Axial Thrust is -ve if it is towards HPT front
There are many ways of balancing axial thrust
-
Double flow self balanced cylinder
-
Mutually balanced individual cylinders
-
By putting balancing drum in the HP Module
-
Having holes in the Discs of the blading
-
Reverse flow in individual cylinder after partial Expansion.
-
Optimizing Steam Extraction Locations
AXIAL SHIFT
-
Sealing fins are also important component of balancing axial thrust
